Game Day Turkey Chili

Comfort food makes winter nights bearable. Sunshine is at a premium, the cold and dark take over and often makes us homebound – and hungry.

One of my favorite go-to dinners on cold nights is chili. It’s an easy dinner to make and – bonus! – make enough, and you have leftovers for dinner and lunch throughout the week.

Today was one of those Sundays. You know when it strikes you that your week is os full of work, social engagements, and more work. The obvious solution is to cut back on the social engagements, but this week I have a fun happy hour, a class at the University of Colorado School of Medicine, and one of my best friend’s birthdays! Keeping all of that in mind, I hit the grocery store, stocked up on veggies and healthy-ish snacks for the week and settled into the kitchen for a night of chili making.

This particular Sunday was also the now-famous Broncos-Steelers game. I had friends at the game and watching the game; I had decided to avoid watching – I always get sucked in, and I think most Steelers fans are annoying. Making a pot of chili was the perfect way to spend my evening.

When I was growing up my mom made really good chili. She used beef, red kidney beans, chili powder, onions – the usual. It is always delicious. I will never forget the time she used really spicy chilies – to this day she can’t recall if they were chipotles or jalapenos – and our unseasoned palates just couldn’t take it. We tried everything; ice, more diced tomatoes, sour cream, milk, extra cheese, more ground beef. Eventually, we persevered and finished the chili.

It should be noted that all the Moran kids (now adults!) grew up to be enthusiastic eaters. Thirty years passed before deciding I liked asparagus. Now, I can’t wait until spring. I’m convinced if my younger sister, Jenn, tries it in different ways, she will also love it.

The following is my turkey chili recipe. It’s adapted from Whole Foods Market recipe, which I used mainly for measurements and flavor profile. I like to use turkey because it’s leaner and has a lighter flavor than beef. If you’re a chili purist (or jerk), feel free to use beef.

Game Day Turkey Chili

(Yes, Denverites, you may call it Tebow Chili)

Serves 4-6

1 T canola oil

1 pound lean ground turkey breast

1 medium red (or yellow, if that’s what you have) onion, chopped

1 medium jalapeno, stemmed, (not cored – the seeds have the heat!), and chopped

2 garlic cloves, finely chopped

1 medium yellow, orange, or red pepper (Use green if that’s what’s available and affordable, I just like the color presentation.), diced

1 28-ounce can diced tomatoes

1 C tomato sauce (I used leftover marinara I had in the fridge.)

2 t chili powder

1-2 t sea salt, or to taste

1/8 t cayenne pepper

1/8 t paprika (smoked is a nice touch, if you have it on hand)

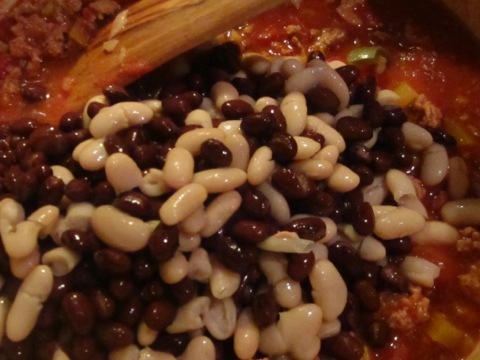
1 15-ounce can white kidney beans or cannellini beans, drained and rinsed

1 15-ounce can black beans, drained and rinsed

Garnishes (optional):

Grated cheddar cheese

Chopped green onion

Sour cream

Preparation:

Heat oil in over medium heat a large pot or Dutch oven (4 quart works well). Add onions, peppers, and garlic to pan and heat through until onions are translucent and peppers are soft, about five minutes.

Add ground turkey, breaking up with a wooden spoon or sturdy, heat-proof spatula. Brown until meat is cooked through, about 10 minutes. Add whole can of tomatoes, and tomato sauce, if using. (The tomato sauce is optional. You could add water or broth, if you don’t have tomato sauce or pasta sauce around.)

Add chili powder, salt, cayenne, and paprika. Bring to a simmer. (Taste your chili at this point. If you need more salt, add a little at a time.)

Cover and cook for 30-45 minutes, stirring occasionally Stir in the beans and cook another five minutes to cook through.

Optional: Serve chili with grated cheddar cheese, chopped green onions, and/or sour cream. I like mine plain.

This chili is great the day you make it, and even better the next day.

20120108-203249.jpg

20120108-203407.jpg

20120108-203428.jpg

20120108-203441.jpg

Advertisement

#pieformikey

Chocolate cookie crust, melted chocolate, and chopped peanuts.

I’ve never met Jennie Perillo. I follow her on Twitter and have shared a few back and forth messages over the past six months. The beauty of social media – and there is something beautiful about it, I promise – is having the opportunity to connect with people you may never meet in person. For instance, Jennie resides in Brooklyn, and I am inDenver. We are not exactly neighbors.

Earlier in the week, Jennie posted that “he was gone” and her heart was shattered into a million pieces. I knew she meant her beloved husband, Mikey. I didn’t know if that meant he left…? Did they have a fight? Jennie’s a strong, smart woman, I figured she and her husband would be able to work things out.

A day later, she posted this http://www.injennieskitchen.com/2011/08/one-last-dance.html, a sweet and short video of a father dancing with his barefoot daughter in the kitchen. And that’s when I knew what happened.

Mikey had died of a massive heart attack. He was young, a father of two young girls and the husband of a woman who adores him. I was at a loss. I’d never met this woman. I couldn’t bake lasagna and take it over to her house. I felt truly helpless. I left her a message on her blog, offering my condolences along with hundreds of her readers and fellow food bloggers.

This morning, I was scrolling through my Twitter feed when I kept seeing the hashtag #apieformikey. And then I found her touching post – a humble request. For all of us wanting to help Jennie, she asked us to make her husband’s favorite dessert, Creamy Peanut Butter Pie, the one she promised him she’d make soon and kept putting it off. They have two young daughters and worked full time jobs. Mikey’s pie wasn’t a priority. Spending time together was. Go read Jennie’s post today, recalling her last date with her husband.

Jennie’s recipe: http://www.injennieskitchen.com/2011/08/for-mikey.html

And if you have time, make the pie. Share it with those you love. Raise a slice to Mikey.

A note: I don’t have a springform pan, so I used a regular pie plate. I also have a weird “thing” about stuff on top of a cream pie. I just like to have the crust and the filling. Read through Jennie’s recipe, if you want to add the melted chocolate to the top of the pie, by all means, please do so. Enjoy.

Finished Pie

Start Your Day Right — Iced Coffee

Summer is here! We had the rainiest month of May ever, and the green grass and gorgeous blooms were a great reward many soggy days.

My perfect summer morning is spent outside, reading the newspaper or a book and drinking iced coffee. Sometimes I even plan world domination.

The best thing about iced coffee is that you don’t even have to use your coffee machine. And if you don’t have a coffee machine, this is even better news for you!


What You Need:

1 cup ground coffee (I use a medium grind)

2 tablespoons light brown sugar

½ teaspoon ground cinnamon

4 cups cold water

1 qt jar or pitcher with a lid

Long handled spoon

Sieve

Make It Happen:

Pour the coffee, sugar and cinnamon into the jar. (If you don’t normally sweeten your coffee, as I don’t, I urge you to try this recipe anyway. The sugar and cinnamon are not overwhelming – but gives the coffee some great depth.) Add the cold water. Stir until well blended. Place the lid securely on the jar or pitcher and either leave on the counter or in the fridge overnight. I’d say about 8-12 hours is the max.

When it’s ready, take off the lid and give it another stir. Pour the coffee through the sieve into another container – a 4-cup measuring cup works well if you have it. If you don’t, just use a mixing bowl. I like to pour the coffee through a sieve twice, just to make sure I’ve gotten as many of the grounds as possible out of the coffee.

To serve, fill a glass with ice and pour the coffee over. Add milk if you like. Don’t be surprised if you drink the whole jar in one day.

Mother’s Day Marmalade

I am not a particularly sentimental person. Until I start thinking about food – and then the emotion I attach to everything I eat, or could eat, becomes very obvious and sentimental, indeed.

I’ve always enjoyed feeding people. I don’t know exactly where this comes from, though my best guess is that it comes from a long lineage of people who like to eat. In my family, we gather in the kitchen. It’s where we’re most comfortable, safe and within an arm’s reach of the wine fridge.

My mom reigns over her kitchen, as she should. I always feel welcome there, except on my birthday when I get kicked out every year for offering to help with dinner. A couple times a year, I get to shoo my mom from the kitchen and cook for the family. It’s a fun, time-consuming process, and I am most happy when I am alone in the kitchen with my thoughts and a sharp knife.

For Mother’s Day this year, I didn’t finish planning the menu until a few hours before we ate, but it was a great success. We had a cedar planked salmon, basil pesto and pasta, haricot verts and for dessert I made vanilla bean panna cotta with lemon marmalade. I have never made panna cotta before in my life. I am not sure what caused my sudden obsession with gelatin, but lemon and vanilla are two of my favorite flavors, and for a spring dessert I knew they would be perfect. Bon Appétit magazine’s May issue boasted a spread of Italian desserts, including the panna cotta.

You can find the recipe for both here:

A couple of things to keep in mind and someone who has “been there”: Making the marmalade a couple of days in advance gives you not only something to do on a Friday night, but the time you need to focus just on the panna cotta the day you plan to serve it. When I make the panna cotta again – and I will – I will decrease the amount of gelatin used by ½. I prefer a softer dessert and the one I presented to my appreciative mother on Sunday was a bit too firm.

Every time I make this marmalade, I’ll think back to the first time I made it, on a Friday night, drinking beer and listening to Mumford & Sons at a very high volume. I’ll remember the way the scent of lemons filled the entire kitchen and that my hands smelled like fresh lemons for a good day and a half afterwards.

I’ll remember the expression on my mom’s face on Sunday, when after looking at the recipe, she turned to me and said, “You know, if you don’t want to make the marmalade, we can just use strawberries with dessert,” and I presented her with the already made marmalade. I know she was happy I had made the effort.

And really, isn’t that what Mother’s Day is all about?

Finished marmalade, cooling.

Hog Wild….Cochon 555 comes to Denver

Save the pigs…eat them! I’m headed to Cochon 555 Denver at the Ritz-Carlton this Sunday, April 3, for Kitchen Raised – eating, drinking and writing my way through a pig lover’s paradise.

Five Colorado chefs: Alex Seidel of Fruition Restaurant, Denver; Kelly Liken of Restaurant Kelly Liken, Vail; Frank Bonanno of Osteria Marco, Denver;  Lachlan Mackinnon of Frasca Food and Wine, Boulder; and Jennifer Jasinski of Rioja/Euclid Hall, Denver will take part in a friendly competition preparing a five 175-pound heritage breed hog from head to toe.

Head to toe cooking is not a new concept. It is however, becoming more well-known as butchers, chefs and consumers are looking for ways to waste less and bring new tastes to the table. By consuming heritage breed hogs, the demand for these animals will go up, helping farmers continue the animal’s bloodlines and continue providing for the consumer.

The breeds we’ll taste on Sunday are Swabian Hall, Hereford, Berkshire, Mulefoot and Red Wattle. I have never tasted heritage pork before, so the information I am presenting to you is based on what Cochon 555 provides on their website.

Later this week, I will be talking to Shannon Duffy of Tender Belly, the company providing all the pigs for this Sunday’s event. Shannon and his brother, Erik, are Berkshire pork purveyors and make some amazing bacon! I can’t wait to share with you what Shannon has to say about this event.

Swabian Hall is a breed from Germany and has a good reputation among foodies for its dark meat and a strong distinct flavor.

The Hereford breed is rare, but also well-known. These hogs resemble Hereford cows, with a reddish brown coat and white face. Herefords are known for their calm dispositions and their ability to thrive in pastures. It is a slower growing breed, and yields a rich colored marbled meat.

Berkshires come to us by way of Britain, and are the most popular of the heritage breeds. It is a black pig with white legs and is known as “Kurobuta” in Japan, and is a favorite breed among chefs because of its intramuscular marbling. The meat is brighter than most others and features a thick, delicious fat cap. (Um, is anyone hungry yet?) The meat is sweet and creamy with hints of nuttiness.

The critically rare Mulefoot breed is a black hog named for its solid hoof, like a mule. The Mulefoot recently won a blind taste test against eight different heritage breeds. The Mulefoot’s disposition is docile, and its weight gain is between 400 and 600 pounds before age 2. This breed is known for its premium hams and superior tasting meat, which is red with freckled marbling.

Last but not least is the Red Wattle, named for its red color and the fleshy skin that hangs under its jowl. This extremely rare breed adapts to climates well and is an excellent forager. Prized for its tender meat and hams, the Red Wattle is lean and juicy with its meat’s texture and taste similar to beef.

Attendees will get to sample pork dishes from the chefs as well as wines from five wineries. They’ll also get to help choose the “King or Queen of Porc”, watch a whole pig breakdown demonstration, and taste a whole roasted heritage breed pig and dessert.

Brady Lowe, event founder said, “…Pork-avores from Washington, D.C., to San Francisco get a chance to discover incredible breeds of pigs and family-run wineries.” Lowe created the event in response to a lack of consumer education around heritage breeds. He believes that by educating the consumer about heritage breed pigs, they’ll in turn make more-informed decisions around food purchasing and their overall health.

If you love pig – and all of you bacon freaks know I’m talking to you, then this is your event. Tickets to this Sunday’s event are $125. If you’re interested, purchase tickets here.


What’s In a Name?

I hope you’ve noticed that I changed the name of my blog. “Lia’s Blog of Big Eating” is now “Kitchen Raised”. I’ve been toying with a name change for quite some time now. I liked what the original name evoked…me and my culinary adventures, bigger is better, etc. I am not always a big eater and not always in your face and louder than life. That name doesn’t speak to my attitude in the kitchen – my kitchen, my parents’ kitchen or your kitchen.

I try to be methodical and build on what I’ve learned in the past to create memorable meals for the present and future. I know I’ve mentioned this before, but I really was raised in the kitchen.  I am one of five children and we were required to help out – only if we wanted to eat – and speaking from experience, I know it’s why we all can hold our own in the kitchen.

I grew up hating asparagus. I did not get how anyone could enjoy it. I couldn’t even say the word “asparagus” without gagging dramatically, which my parents thoroughly enjoyed. Enter my mid-20s. My mom started roasting asparagus in the oven, sprinkling it balsamic and shaved parmesan. Now I would gladly eat asparagus every day if I didn’t think it was unfair to other vegetables.

As kids, we learned how to clean and prepare vegetables, make an omelet and frost a cake. We learned menu planning and time management (still not so great at that) and important things like how to cook pasta and meat thoroughly. We accompanied my mother on trips to the grocery store and farmers’ markets.

As adults, we drink from my parents’ vast wine collection and peruse my mother’s ever expanding cookbook collection. When I go to mom and dad’s, I toss my belongings wherever, rarely hanging up my jacket and head straight for the fridge. Much to my parents’ chagrin, I’ll stand with the refrigerator agape and demand; “Do we have anything to eat?” before rummaging through blocks of cheese, hard salami and whatever else I can get my hands on. Sitting at the kitchen table, the same table I’ve eaten family dinners at for years, I’ll read Julia Child, Thomas Keller, and Mario Batali and drink too much wine. This is home.

I hope you understand the name change – it speaks the knowledge I’ve gained as someone who seeks out the kitchen in every home I visit and my desire impart the joy of cooking to my readers. Thanks for joining me.

As always, please feel free to comment or ask questions.

Feeding Hungry Masses: Lasagna

I’ve been making lasagna for years. It’s a dish I grew up with; it made frequent appearances at our dinner table and was a good standby at potluck dinners. I don’t know if I ever asked for a recipe from my mom, or after watching her make it countless times I just figured it out.

It’s great for Sunday dinner because you will inevitably have leftovers – unless you’re really hungry or feeding a crowd – and it’s nice to have at least one planned leftover for the week.

My friend Justin has been asking me for months to teach him how to make lasagna. I can’t remember the origins of the conversation, but I suspect it has something to do with him perhaps not entirely believing I can cook.

Regardless, I did promise the guy I would show him how easy it is to make the most comforting, cheesy deliciousness that is lasagna. After some back and forth, we settled on a date and he even wrote it in his calendar. And I doubted his commitment to cooking.

Before Justin and his entourage of hungry men came over, I had a slight panic attack. I’ve never written down a recipe for lasagna. I just wing it. And it turns out wonderful each time. I come from the “It’s hard to mess up a pot of Bolognese” school of thought, but still, I knew he would need a recipe.

I trolled the Internet for lasagna recipes; I needed to know that what I had cobbled together by memory was pretty close to what epicurious.com and the Food Network would show me. I pick those two websites, not because I like their recipes all that much, but it’s easy to find basics and build from there. I was on the right track, or at least close enough. A couple of recipes called for cottage cheese instead of ricotta. Now, I am no culinary purist by any stretch of the imagination, but that is something I will not use in lasagna. You can if you want to. I believe that ricotta has a smoother, richer taste. And yes, you can purchase low fat ricotta and the lasagna will still be delish.

I also consulted the new edition of “The Joy of Cooking”, and found its recipe for Bolognese Sauce to be superior to what I planned to use. I didn’t have pancetta in the house; otherwise I would have considered using it. But my worry slowly subsided. I’ve made the roughly the same “recipe” when I’ve made lasagna for years. No one has ever complained that it wasn’t meaty or cheesy enough. If anyone hasn’t liked it, they’ve never told me.

I called my friend Stephanie over, as I put it, “I may need you to regulate. I have no idea what to expect.” She arrived with two beers in hand.

As someone who cooks alone more often than not, it was fun to have a noisy kitchen. Justin is an easy student, albeit slightly demanding. If I tried to scoot in front of him to check on the sauce’s progress or mix the cheese and eggs, he’d say, “Hey! Aren’t I supposed to be doing this?!”  And he says I have a Type A personality…

The lasagna was a hit and Justin proved that he’s no slouch in the kitchen. For those of us who do cook, there is a prideful feeling we get when we teach someone how to make something we love.

Lasagna

Ingredients:

1-1/2 pounds ground beef

1 pound hot Italian sausage, casings removed

2 cloves garlic, minced

1 28-ounce can of whole tomatoes

2 6-ounce cans tomato paste

4 tablespoons dried parsley, divided

2 tablespoons dried basil

1 teaspoon salt

3 cups ricotta cheese

2 whole eggs, beaten

½ cup Parmesan cheese (grated or shredded)

2 cups fresh baby spinach, optional

1 pound mozzarella cheese, grated

12 lasagna noodles, cooked al dente

Bring a large pot of salted water to a boil.

In a large skillet, or saucepan, combine ground beef, Italian sausage (remove from casings) and minced garlic. Cook over medium-high heat until browned. Drain ¾ of the fat. Add tomatoes, tomato paste, parsley, basil and salt. Mix well and turn down heat to medium low. The sauce should simmer for about 30-35 minutes.

Add lasagna noodles to boiling water and cook until al dente, about 7 minutes. Strain noodles. If you would like, you can sprinkle the noodles with a small amount of olive oil to prevent sticking. Otherwise, just hang the noodles over the edge of the colander.

In a medium bowl, mix ricotta, beaten eggs, Parmesan, remaining parsley and 1 teaspoon salt. Mix with a wooden spoon or rubber spatula. Gently stir in baby spinach, if you’re using it.

Preheat oven to 350°F.

To assemble:

Arrange 4 cooked lasagna noodles in the bottom of a 9 X 13 baking pan, overlapping if necessary. Spoon half the cheese mixture over the noodles. Spread evenly. Spoon a little less than half of the meat sauce on top of the ricotta. Next, sprinkle a layer of grated mozzarella. (Note: we used sliced mozzarella based on the recommendation of someone who shall remain nameless. Either pony up the cash for grated mozzarella or use a grater. A food processor will get the job done nicely, too.)  Repeat steps, ending with meat sauce mixture. Sprinkle generously with extra Parmesan.

Bake for 30-35 minutes, until the top is hot and bubbly. Let stand for 15 minutes before you serve it.

Justin browning beef and Italian sausage.

Cheese, meat and pasta...yum.

Hot bubbly goodness. Let it sit for about 15 minutes so it all sets up. It's worth the wait!

Stranahan’s Whiskey | Batch 66


Filling Bottles.

Labeling.

Stranahan’s Colorado Whiskey | Batch 66

Just recently (and I mean very recently) I became a fan of whiskey. I love that I can sip it slowly and feel incredibly grown up. I like it without accoutrements – no soda, ice or water for me. I like my whiskey neat.

Being new to whiskey, I’ve only had a few brands, and have considered them drinkable. I like Jameson, it works for me. I will drink Jack Daniels, but only if that’s all that’s available. I prefer, when available, whiskey from small batch distilleries where I can read the stories of the people behind the amber-hued spirit, and learn what the company is about.

I had heard soft, drunken mumblings about Stranahan’s: “It’s Colorado Whiskey! As a Colorado girl, you should love a Colorado whiskey!” I did a little research. Not a lot. Just enough to find out that it was a ten minute drive from my home in Washington Park, and I could convince a co-worker to tour the place.

The tours are free. “You get to see how they make whiskey!”, was my argument for why he should be interested and willing to come pick me up and drive us down there. It worked.

We went on the tour. It was everything you expect a distillery tour to be, informative, a little over your head and fun. I won’t pretend to understand the finer points of distilling whiskey, but I do know this about it:

– I like it. A lot.

– It goes well with a little ice or nothing at all

– A little goes a vey long way

After our tour, we were given samples and led through a guided tasting of the whiskey. If you’ve never done this, I encourage you to do so! It’s an amazing experience and beneficial to have an expert walk you through the finer nuances of whiskey.

We signed up to be volunteer bottlers. “What’s a volunteer bottler?” you ask. Why, it’s like winning the whiskey lottery for a day. You get called (emailed) and report for duty for a 5 hour shift during which you bottle the whiskey. You’re not paid, per se, but you do get a 750 ml bottle of Stranahan’s Colorado Whiskey for your troubles. The nice folks at Stranahan’s also feed you.

We started at 8:30 this morning, and Jake, the head distiller walked us through the process. Volunteers get to try almost everything, except fill the actual bottles, that’s done by “Charlene”, a filing machine manned by a Stranahan’s distiller. We corked the bottles, affixed labels, attached caps, shrink-wrapped seals, and packed up the filled bottles to be sent to distributors. Our team of 20 bottled 2500 bottles of whiskey in three and a half hours.

I love personal stories behind food – and beverage. To read the Stranahan’s labels as we were bottling is such a treat. The required information is there:

Batch Number: 66

Alcohol by Volume: 47%

Volume: 750 ml

Proof: 94

Distilled: 12-30-08

Comments: Listening to Johnny Cash

When distiller Rob was working, he was also writing on labels that we would later place on bottles. Other distillers wrote about what they were doing at the time:

“Listening to DeVotchKa” (my favorite Colorado band!), “Reading The Fountainhead” and “Listening to ‘This American Life’”.

I love picturing these men in the distillery, just waiting for the whiskey to move on to its various stages, while reading, listening to music, or watching South Park.

Go see what’s out there. You won’t always get the chance to meet the people who bottle your whiskey, grow your tomatoes or break down your beef. But if you have the chance, why not take it? The relationships you can build with those individuals are tremendous.

And if you have the chance, go work at Stranahan’s for a bottling. Sign up here.

My bottle, which I have still not opened – I’ve only had it in my possession for eight hours – has “Listening to Johnny Cash” written on it. I did hear “Ring of Fire” today, so it seems apropos.

Go check out Stranahan’s Colorado Whiskey for yourself.

Straight Rocky Mountain Whiskey. Head Distiller Jake signed my label. Nice guy!

Mushroom and Barley Soup

Browning the barley with mushrooms and carrots.


Every year, about this time, I yearn for spring. My anticipation stems primarily from my love of baseball and being outdoors without having to wear a parka. I love spring because the world seems awash in color; bright green grass and trees basking in the sun, daffodils and crocuses popping up everywhere.

Back to reality: it’s January in Colorado, which means it’s cold, gray and snowing. It’s the perfect weather to spend inside in the kitchen making something to warm your soul and wait out winter.

This morning I was thinking about mushrooms. I love mushrooms because they smell like the earth. I can’t think of a more organic smell than mushrooms. I would eat sautéed mushrooms everyday if I didn’t think it was ridiculous.

I came across Mark Bittman’s recipe for Mushroom and Barley Soup. It’s extremely easy – chop up your veggies, sauté the mushrooms and carrots together, then brown the barley, add broth and let it cook away. It tastes so hearty, that the only accompaniment you need with it is some good crusty bread…and I don’t even like bread.

For this soup, I used about 12 ounces of mushrooms total (8 ounces baby portabella, 2 ounces fresh shiitake and roughly 2 ounces of rehydrated wild mushrooms). Bittman doesn’t call for onion in his mushroom soup, but I like the flavor.

I chopped up half onion and sautéed it in 2 tablespoons of olive oil. I sautéed two sliced carrots and the (cleaned and quartered) mushrooms (including the rehydrated ones; squeeze out the liquid and save it). Add a cup of pearled barley and sauté until browns; it should have a nutty aroma.

Then, add liquid. If you want vegetarian soup use 6 cups of vegetable broth and/or water. I had leftover chicken stock and purchased vegetable broth. Add a bay leaf and salt and pepper to the pot, and bring to a boil. I immediately put the soup into a slow cooker and let it simmer for about 20 minutes, until the barley soaked up the liquid and the grains split. Cooked barley looks somewhat like brown rice.

The soup is perfect for winter, but the earthiness of the mushrooms make me look forward to spring.

If you have Mark Bittman’s “How to Cook Everything”, the recipe is on page 139. If you have the iPhone app, it’s listed under “Vegetable Soups”.

Baby Bellas

I hope you have the opportunity to make this very easy and satisfying meal.

Mushroom and Barley Soup.

Eggs for People Who Don’t Have Time to Cook Eggs


I believe perfect food exists. And it is, unequivocally, the egg.

I have always loved eggs. Growing up, I learned how to scramble them with a flat wooden spatula, scraping back and forth, pushing the little pile of eggs to the middle of the pan, then around the pan a few times. My early scrambled eggs were pretty dry, it would be years before I learned to turn heat down and whisk the eggs into soft submission. I also learned how to fry an egg, flipping it with a spatula and being immensely proud if the yolk remained intact. My mom taught all of us to make omelets,

In our home, food preparation was a group effort. On school mornings, the first fully-clothed and ready for school kid into the kitchen in the mornings got to pick what was for breakfast. If I was the first one we’d have fried eggs or scrambled eggs, toast, juice and be on our way to school. If it was my older brother, we had cereal. This plan of my mother’s (to have five kids who could fend for themselves in the kitchen) worked pretty well, even when we all went to different schools and had breakfast at five different times.

As I’ve gotten older,  I’ve refined my tastes – or so I would like to believe. These days,  I eat fried eggs on hamburgers (pretty classy and packs a protein punch) and am always looking for interesting fillings for deviled eggs. My favorite thus far is smoked salmon, fresh dill and crème fraiche. It is indulgent and naughty – and perfect for lazy afternoons.

My new favorite breakfast is Mark Bittman’s Baked (Shirred) Eggs. The recipe is simple, the results are delicious. This is really easy for people who have trouble getting out of the house without causing utter chaos. (I am one of those people.)

First, preheat your oven to 375. Do this after you’ve showered, but before you dry your hair. Spray the inside and sides (lightly) of two ramekins. If you like creamy eggs, pour a couple of teaspoons of cream into each ramekin. Break an egg into each cup and then set them on a baking sheet.

Go dry your hair.

Bake for 10-15 minutes. During this time, finish getting ready, but stay near the kitchen. If you like your eggs a little soft, take them out at about 11 minutes. Sprinkle each with a little salt and pepper and serve. I like to eat them with a spoon.

If you have leftover vegetables (I like spinach, especially), serve the eggs on top of your reheated veggies.

Julia Child’s recipe calls for the ramekins to be placed in a pan of hot water and baked for 10 minutes. Her method yields very custardy eggs – heating the cream in the ramekins first, then adding an egg to each once the cream is hot, pouring more cream and a pat of butter (really!) over the egg and baking for 7 minutes.

New Year’s Resolution Breakfast it is not. If it makes you feel better, have some whole grain toast and fruit on the side.